Tuesday, April 26, 2016

Say Hello to my Simon Cowl


How did I come to name this cowl, you may well ask. True story: After I finished it and tried it on, I said to myself "this is a cuddly, warm, Simon Cowl". Maybe I had a glass of wine, maybe not, before I named him, but he is warm, he is cuddly, and most important of all, he is Easy!

Now that you are all smiley and tsk, tsking, here is
 The Pattern.  My best advice is to read the pattern all the way through to make sure you understand it. Aso, you will understand that the edges of the work are done in Garter Stitch--that is knit every row.
 Necessary items:  Needles size U.S. 10 or 6mm.  I use cabled needles, because they don't (usually) drop off stitches when my back is turned.  You, if you can trust them, may use Straights.
Yarn:  2 skeins of acrylic Red Heart White or any Medium Weight yarn that is soft, and any colour you wish.  I prefer white.
How to: This is knit like a scarf, only not as long, and really, if you want to you could knit it into a scarf,(adding 6 - 8 rows of rib stitch at the beginning and end) which is longer than a cowl and you will need another skein.  You could still call it Simon, but it wouldn't be as cute!
So, cast on 48 sts.  This cast on row is NOT Row 1.  Odd Rows are the Right Side of work.  Even Rows are the Wrong Side of work.
This is a 10 Row Repeat Pattern.  Which you "Repeat" 12 times, or more if you need it to be longer.

Row 1: Right Side:  Slip 1st stitch knitways.  K 5;  P9;  K6;  P9;  K6; P9; K6
Row 2:  Wrong Side.  Slip 1st st. knitways.  k5;  K9;  P6;  K9; P6; K9; K6
Row 3:  Repeat Row 1
Row 4:   Repeat Row 2
Row 5:   Slip 1st St., K5;  P 6;  K3; P3; K3; P6; K3; P3; K3; P6; K6.
Row 6:   Slip 1st St., K5;  K6;  P3 ; K3; P3; K6; P3; K3; P3; K6; K6
Row 7:   Repeat Row 5
Row 8:   Repeat Row 6
Row 9:  Repeat Row 5
Row 10:Repeat Row 6
Now go back to Row 1.
As mentioned above, do these repeats for as many times as needed.
When you are at the last of the 10 row pattern, cast off loosely, and then join the two ends to form the cowl.
This pattern is free to share, just give little old me an acknowedgement.  Happy Knitting!

Monday, April 25, 2016

Here's A Simple Blanket Pattern

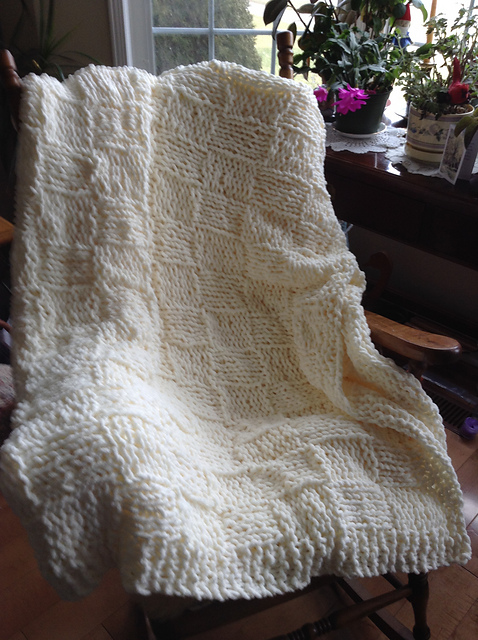
This is a simple pattern that I worked up. It's basically knit 4, purl 4, garter stitch at the bottom and top edges, garter stitch at both sides. You may share without charge, just give me an acknowledgement to make me happy!
 ............................................................
 The Necessities are:
Yarn: 5 Skeins Bernat Blanket yarn in any colour you choose
 Needles: US 11/8mm Cabled set if you can, because the project gets heavy) For casting on I recommend using one size up needles US 17/12.75mm. This will help the edge to not pull in.  I also advise for casting off.  Again to prevent a 'pulling in ' of the edge.
Gauge: 8 stitches//13 rows = 4 ", so 2 sts, 4 rows  gives 1 inch of blanket.  Doing up a 4 inch swatch gives a better idea of  how the gauge will fit what your finished blanket will measure.
Please, please, I strongly advise you to  read the pattern all the way through as that will help you to have an easier time knitting this project.  Then, if you have any questions, post in the Comments and I will do my best to answer you.
PATTERN
 LOOSELY cast on *122sts   120 of those stitches are knit as the pattern. The first and last stitches will be slipped and knit to make a firm edge.  You could cast on more (you will need more yarn for a larger blanket) or less, depending on how wide you want the blanket to be. Just have a number divisible by four.   The 122 sts will have the blanket be approximately 60 wide.
** My personal preference is always to cast on 2 extra stitches to this pattern, because I prefer to have a firm edge by slipping the first stitch, knit ways, of every row and knitting the last stitch of every row. There are other methods of getting a nice looking edge stitch. I suggest using Google to look up Edge Stitches.**
 Then you will begin the pattern.
After your Cast on row, and knitting the next four rows, the Basket Weave pattern begins.  DO NOT count the cast on row as the beginning of the pattern.
 Knit every row (Garter Stitch) for next 4 rows, remembering to always slip the first stitch knit ways and knit the last stitch of every row or do whatever edge stitch you prefer.  Side Edge I use   is worked as: Slip the first stitch knit ways, then Knit the next 4 and last 4 stitches of Every row plus that 1 extra stitch at the row end for the firm edge, until the Last 4 rows, where you then Knit all stitches (Garter Stitch) Remember the Slip 1st stitch knit ways that you have been doing all along  and Cast off Loosely, Knit ways on the 5th row using the larger size needle in your right hand. *(see HINT below) The Basket Weave effect is achieved in this manner:   Slip the 1st stitch knit wise, then after Knitting the first 4 stitches (Side Edge Stitches), knit 4 stitches and purl 4 stitches up to the last 5 stitches (that's the 4 plus 1 for the edge stitches). On the reverse side, after the edge stitches, purl 4, knit 4 for 10 rows. So you are purling the purl stitches and knitting the knit stitches.  The next 10 rows, you are reversing the knit and purl blocks, which  makes the Basket Weave pattern and the Blanket/Throw reversible.   Look at the picture above if that is not clear to you. So, you are knitting 4, purling 4 for 10 rows,then reversing the order of the groups of 4 for 10 rows, etc., until you reach the length you desire. **HINT: To have enough yarn for the the last 4 rows and the cast off row (5 rows total): After casting on the first row, Knit 2 rows, put a safety pin into the yarn and undo one row you just knit. (that other row of the 2 you just knit will count as row 1 of the bottom edge of the blanket) Measure the yarn from the safety pin to the beginning of the row still on the needle, multiply that by 5, then add another 12 inches to that number and you will know how much  yarn is needed to finish. I allowed an extra 12 inches in length because the cast off row should be loose, so that the edge does not ‘curl’. Write that measurement down, or, my preference,  pull off enough yarn from the last skein you will use. I tend to start a skein from the centre, so I measure off the amount from the outside of the skein and make a slip knot and put that safety pin in the loop so it won’t come undone. Then when you get a couple of feet close to that Marker/Safety Pin, you can decide whether you have enough yarn to complete the basket weave pattern, plus the four row garter stitch, knit every row, edge for the blanket.       Happy Knitting!

Trying my hand at Knitting Design

Here is a Pattern I designed.

   Five Cables Cowl --  An Original Pattern by Ann of Green Cables.

Feel free to share for No Charge.  I would appreciate  an Acknowledgement if you like the Pattern.

Please read the whole pattern through so that you are familiar with the stitches and terminology.
 
There is Additional pattern information at the end of the instructions  in regards to adjusting the pattern for other uses.

Yarn Info:  Red Heart Soft Solids & Heather   Light Grey Heather Colorway, Aran 10 ply
You can choose to use another color or combination of colors or Yarn that gives the guage.
Needles 5.5 or 6 to get gauge of 8 rows= 2''
Length 26” (or length when two ends are joined will go over your head with ease)Width  12''

Pattern:  Cast on 56 Stitches
Do NOT count the cast on  row as Row 1.
Row 1:  (this is the wrong side of your work, as are all odd rows)
Slip 1st stitch Knitwise; knit 4; purl 6; k4; p6; k4; p6; k4; p6; k4; p6; k5 (end of Row 1)
Row 2:  (this is the right side of work, as are all even rows)
Slip 1st stitch knitways;  k10; p4; k6; p4; k6 p4; k6; p4; k10; k1 (end of row 2)
R 3:  Repeat Row 1
R 4:  Repeat Row 2
R 5:  Repeat Row 1
R 6:  Repeat Row 2
R 7:  Repeat Row 1
Row 8This is the Cable Row:
Slip the first stitch knitwise;  Knit 4; Now you are going to make the First cable: Using a stitch holder/cable needle,
slip next 3 stitches knitwise onto the holder.
Hold these stitches at the Back of the work.  Knit the next 3 stitches from the left needle onto the right needle.
Now, transfer the 3 held stitches from the holder onto the left needle, knitwise.
Knit these 3 stitches.  This is your first cable.  It may look 'weird', but it will look better as you progress.
Purl 4 sts..
   Second Cable:  place next 3 sts onto holder and hold at Front of work;
Knit the next 3 sts. onto the right needle.  Now knit the 3 sts from the holder onto the right needle.  Second Cable formed.
Purl 4 sts.
 Third Cable; place next 3 sts onto holder and hold at Back of work.  Knit 3 sts.; Knit 3 sts from holder.
Purl 4 sts.
 Fourth Cable:  Place next 3 sts.  onto holder and hold in Front of work.  Knit 3 sts.; Knit 3 sts from holder.
Purl 4 sts. Fifth Cable:  Place next3 sts. onto holder and hold in Back of work.  Knit 3 sts.; Knit 3 sts. from holder.
Knit 4sts.  knit last stitch.
These Rows 1 to 8 are to be repeated as many times as you wish.
When the piece is as long as you want it to be, cast off loosely Purl wise.  Join ends together to form cowl.

Additional information:  If you wish to make a scarf, cast on 36 stitches.  This will give you 3 cables.
Adjusting the stitch count to 36, will eliminate 2 cables, so after the third cable you will knit 4 sts and knit the last stitch.
If you choose to make a scarf, you may want to first knit a few Rib stitch rows in a pattern of your choice, e.g.: k 2; p2 or any
decorative rib stitch, such as a twisted or k 4 p 4. and end the same way, casting off loosely to keep the stretch inherent in Rib stitch.
If you have read the pattern you may realize that you are slipping the first stitch of every row knitwise and knitting the last
stitch of every row.  You are also, by knitting the first 4 and last 4 stitches of every row, making a firm top and bottom
edge, or if making a scarf, a firm side edge. 


Wednesday, June 17, 2015

DID YA MISS ME?

Helllooooo! Almost a year since my last post.  I have been using FB more and more, so this blog got put to the side.  No idea if anyone reads it, aside from some of my "nosey" family members. LOL!!!!
Time passes and we all get bigger asses!  Mine has been getting progressively bigger and since the extra weight has an impact on my aging knees, I am slooowwly getting it off.  Pain is a great motivator and so is feeling decrepit when the crepitus of the knee starts.  I downloaded some self-hypnosis weight loss apps onto my IPad and over the last month I have to admit (didn't really think they would work, just liked the music), that I am not craving or mindlessly eating so called junk food, eating more fruit and veg, also feeling satisfied with less on the plate at mealtimes.  My thought processes are more clear and the morning wake up is not as "feeling tired still", so getting started isn't the chore it was becomeing. The 'tapes' were not expensive and some were free to try, with the option of upgrading.  All in all, the money was well spent.  The $$ were a gift at Christmas to use on ITunes, so FREEE to MEEE!  Now to get back to the exercise I was putting off because of the Knee Pain.  Oh what a vicious cycle I got into.  The only cycle I should be in/on is the Elyptical one in the workout area.  Definately tomorrow....really....I mean it! So, now my 3pm coffee break is over and on to the next thing on my list.  Sewing for a friend.

Friday, July 25, 2014

Kids!!!!

Doing a little Kid-Wrangling today.  Keeping an eye on four 10 year old girls and one (very patient) 10 year old boy.  Much splashing in the pool, lots of eeeeeeks! and laughter from all.  THIS is what summer should be.....laughing, splashing, chasing each other, getting the most out of the day.  I can watch from the shade of the deck and do my knitting, play on the laptop aaaaand get some fresh air.  Since my friends are now home, someone else is in charge of the dog walking, so, since I don't have to go outside...what do I choose, but to sit inside.  The Folly!!!!  I think that I will now spend as little time indoors as possible.  It's too easy to while away the day indoors, doing nothing really.  Of course if it gets too hot and sticky I am better off inside.  So, back to the kid-wrangling.  TTFN!

Sunday, July 20, 2014

Look At Me!

Look at me...posting again.  I am working on the lace stole/scarf pattern (Gothic Leaf Lace) and although I have made a few errors, it seems that I will have something nice for my efforts.  This a trial-run using Sparkle yarn with Zellers on the label.  Bought it at Bibles for Missions in Guelph.  I will use the Lion Brand Sirdar Snuggly for the second practice.  That should turn out to be a Shawl.  Then if that turns out okay I will buy a more expensive yarn to make an even prettier shawl for myself. Below is a pic of the pattern.

Friday, July 18, 2014

Lovely Morning, Lovely Shop

It's a beautiful day in the neighbourhood, .....La, la, la....Mr. Rogers you are missed.
So, fellow travellers I got myself up at 6:45am, fed, showered and dressed (in that order, 'cause any other would be....well, not good!) Talked to youngest daughter about cottage plans, walked the doggie, and went to check out the new Wool on William shop. Lovely shop, friendly owner,Leslie and the other shoppers were friendly too.  Met another Ravelry member, Moya and we discussed stash and the explaining to loved ones that one can never have too much stash. LOL   I bought two balls of a  pretty, light green Sirdar Snuggly Bamboo,  yarn to practice a new lace stitch.  It will likely be a shawl as I seem to be into those right now.  W.O.W. has a Wednesday Stitch Night and I am considering checking it out next week.  "Stay tuned for further developments on that front."